 Source
Install Xen on Ubuntu Server 15.10
I want to run a Mesos cluster. I want to test Asgard, docker, Kubernetes, and Consul. I want to understand how docker, LXD, and CoreOS work together (or do not). I have one spare machine.
This is a guide to install the Xen hypervisor on a fresh install of Ubuntu Server 15.10. The end result is a working Xen installation with a running Ubuntu Server 15.04 guest (aka Virtual Machine (VM)).
Host Installation Notes
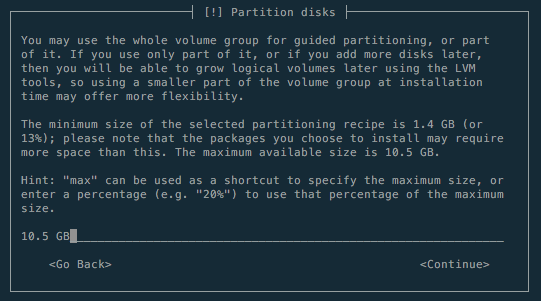
Use Logical Volume Management (LVM) when configuring the disk and leave plenty of space free.
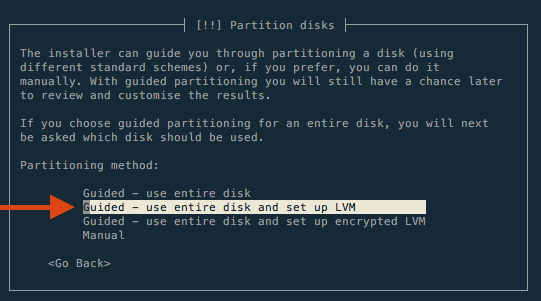
I only used 25GB for the root LV, leaving nearly 1TB of room for guests. (the screenshot below is from a different installation)
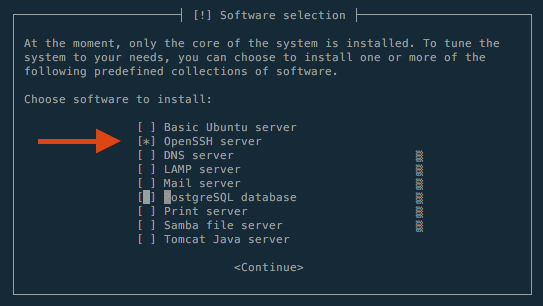
Only the OpenSSH Server collection needs to be installed.
For the rest of the guide, xen01 is the Xen host. All others are guests (VMs).
(Optional) Initial House Keeping
This section has optional items that overall make interacting with a remote system faster and easier.
SSH Keys
Add your public key to the new Xen host to allow easier SSH access. Most operating systems include ssh-copy-id and can follow the ssh-copy-id section below. For OS X, however, follow the Manual method.
NOTE: OS X does not ship with ssh-copy-id, however, it is available through Homebrew. It can be installed with brew install ssh-copy-id.
ssh-copy-id
Use ssh-copy-id to copy a public key (-i) to a target host (xen01).
 1 $ ssh-copy-id -i ~/.ssh/id_rsa.pub xen01
 2 /usr/local/bin/ssh-copy-id: INFO: attempting to log in with the new key(s), to filter out any that are already installed
 3 /usr/local/bin/ssh-copy-id: INFO: 1 key(s) remain to be installed -- if you are prompted now it is to install the new keys
 4 cdcd@xen01's password:
 5
 6 Number of key(s) added:        1
 7
 8 Now try logging into the machine, with:   "ssh 'xen01'"
 9 and check to make sure that only the key(s) you wanted were added.
10 $ ssh xen01
11 Welcome to Ubuntu 15.10 (GNU/Linux 4.2.0-16-generic x86_64)
Manual
The manual way.
First, copy your public key.
1 $ cat ~/.ssh/id_rsa.pub
2 ssh-rsa AAAAB3NzaC1yc2EAAAADAQABAAABAQC85KQGATGvzLkwSQM1q31AmNcb06kCAmq157AGBkYTsS/kVpxTcmcNfcHHXmXlFEf5tXzkRlVxxRMM4xy0o/97LQlRi4c+4ZtVvsFmW/5qMxC2URbmW/5qMxC2URbssESn2BXSBqF7mimlAYwlIB5KMquPcuV1BW0vuqZ1PAQD934UTgngT8ziAWyNW+4cS5LBqtUu6Kv/Dp+uRNvl6Wj3o8Edu9VG8H0L47PbNxmjGaqIuDO1qjxXEfFdCbmW/5qMxC2URb2/betOnh4MW21kMr2vn8nmwUh2b+hIjE3OzlFuf8yXwAW2kJ+tesjlqyGCpOx4ZjEzfx87nWku18CymhV cdcd@here
Next, SSH to the target host.
1 $ ssh xen01
2 cdcd@xen01's password:
3 cdcd@xen01:~$
SSH-related items live under a user’s home directory in the .ssh directory. It must be secured with mode 700!
Public keys that are authorized to log into a user’s account are stored inside the authorized_keys file. It also must be mode 700. Paste the contents from the public key above into this file.
1 cdcd@xen01:~$ mkdir ~/.ssh && chmod 700 ~/.ssh
2 cdcd@xen01:~$ touch ~/.ssh/authorized_keys && chmod 700 ~/.ssh/authorized_keys
3 cdcd@xen01:~$ vi ~/.ssh/authorized_keys
4 ssh-rsa AAAAB3NzaC1yc2EAAAADAQABAAABAQC85KQGATGvzLkwSQM1q31AmNcb06kCAmq157AGBkYTsS/kVpxTcmcNfcHHXmXlFEf5tXzkRlVxxRMM4xy0o/97LQlRi4c+4ZtVvsFmW/5qMxC2URbmW/5qMxC2URbssESn2BXSBqF7mimlAYwlIB5KMquPcuV1BW0vuqZ1PAQD934UTgngT8ziAWyNW+4cS5LBqtUu6Kv/Dp+uRNvl6Wj3o8Edu9VG8H0L47PbNxmjGaqIuDO1qjxXEfFdCbmW/5qMxC2URb2/betOnh4MW21kMr2vn8nmwUh2b+hIjE3OzlFuf8yXwAW2kJ+tesjlqyGCpOx4ZjEzfx87nWku18CymhV cdcd@here
Log out and ssh back to the host. A password prompt should not be displayed.
1 cdcd@xen01:~$ logout
2 $ ssh xen01
3 Welcome to Ubuntu 15.10 (GNU/Linux 4.2.0-16-generic x86_64)
Update Packages
Update packages to the latest and greatest. This ensures the system has the latest software, which could include bug fixes, security fixes, and performance improvements.
 1 cdcd@xen01:~$ sudo apt-get update && sudo apt-get -y upgrade
 2 [ snipped ]
 3 Reading package lists... Done
 4 Reading package lists... Done
 5 Building dependency tree
 6 Reading state information... Done
 7 Calculating upgrade... Done
 8 The following packages will be upgraded:
 9   python3-distupgrade ubuntu-release-upgrader-core
10 2 upgraded, 0 newly installed, 0 to remove and 0 not upgraded.
11 Need to get 126 kB of archives.
12 After this operation, 0 B of additional disk space will be used.
13 [ snipped ]
Network Configuration
If the Xen host was setup using DHCP, now is the time to swap to a static IP address. This will prevent issues later when a new IP address is assigned.
NOTE: The below snippets use the interface eno1 and a network of 192.168.1.0/24. Change these values to match your system and network!
 1 cdcd@xen01:~$ sudo vi /etc/network/interfaces
 2 # This file describes the network interfaces available on your system
 3 # and how to activate them. For more information, see interfaces(5).
 4
 5 source /etc/network/interfaces.d/*
 6
 7 # The loopback network interface
 8 auto lo
 9 iface lo inet loopback
10
11 # The primary network interface
12 auto eno1
13 iface eno1 inet static
14   address 192.168.1.18
15   netmask 255.255.255.0
16   gateway 192.168.1.1
17   # 8.8.x.x are Google
18   dns-nameservers 192.168.1.1 8.8.8.8 8.8.4.4
Reboot
Reboot to apply the network changes and allow updated software to refresh itself.
1 cdcd@xen01:~$ sudo init 6
2 Connection to xen01 closed by remote host.
Installing Xen and Dependencies
This section mostly follows the Beginners Guide available on the Xen wiki.
Bridge Networking
Bridged networking allows guests (VMs) to access the local network directly instead of using NAT technology or being isolated to a network only accessible on the Xen host. This post uses bridge-utils, but this can also be accomplished through Open vSwitch as well.
Install the bridge-utils package.
 1 cdcd@xen01:~$ sudo apt-get -y install bridge-utils
 2 Reading package lists... Done
 3 Building dependency tree
 4 Reading state information... Done
 5 The following NEW packages will be installed:
 6   bridge-utils
 7 0 upgraded, 1 newly installed, 0 to remove and 0 not upgraded.
 8 Need to get 28.6 kB of archives.
 9 After this operation, 102 kB of additional disk space will be used.
10 Get:1 http://us.archive.ubuntu.com/ubuntu/ wily/main bridge-utils amd64 1.5-9ubuntu1 [28.6 kB]
11 Fetched 28.6 kB in 0s (81.7 kB/s)
12 Selecting previously unselected package bridge-utils.
13 (Reading database ... 59183 files and directories currently installed.)
14 Preparing to unpack .../bridge-utils_1.5-9ubuntu1_amd64.deb ...
15 Unpacking bridge-utils (1.5-9ubuntu1) ...
16 Processing triggers for man-db (2.7.4-1) ...
17 Setting up bridge-utils (1.5-9ubuntu1) ...
Add a new bridge interface named xenbr0 and confirm it is available.
 1 cdcd@xen01:~$ sudo brctl addbr xenbr0
 2 cdcd@xen01:~$ ifconfig -a
 3 [ snipped lo/loopback ]
 4 eno1      Link encap:Ethernet  HWaddr
 5           inet addr:192.168.1.18  Bcast:192.168.1.255  Mask:255.255.255.0
 6           inet6 addr: fe80::16da:e9ff:fe4f:9aa0/64 Scope:Link
 7           UP BROADCAST RUNNING MULTICAST  MTU:1500  Metric:1
 8           RX packets:636 errors:0 dropped:0 overruns:0 frame:0
 9           TX packets:342 errors:0 dropped:0 overruns:0 carrier:0
10           collisions:0 txqueuelen:1000
11           RX bytes:83796 (83.7 KB)  TX bytes:52379 (52.3 KB)
12           Interrupt:18 Memory:fbd00000-fbd20000
13
14 xenbr0    Link encap:Ethernet  HWaddr
15           BROADCAST MULTICAST  MTU:1500  Metric:1
16           RX packets:0 errors:0 dropped:0 overruns:0 frame:0
17           TX packets:0 errors:0 dropped:0 overruns:0 carrier:0
18           collisions:0 txqueuelen:0
19           RX bytes:0 (0.0 B)  TX bytes:0 (0.0 B)
Update /etc/network/interfaces to use the bridge interface instead of the ethernet interface. This means setting eno1 from static to manual and moving the IP configuration to the new xenbr0 device. The bridge_ports setting binds the specified interface (eno1) to the bridge.
The bridge_ parameters are explained on the debian wiki. I commented the section below with snippets from the linked wiki page.
 1 cdcd@xen01:~$ sudo vi /etc/network/interfaces
 2 # The primary network interface
 3 auto eno1
 4 iface eno1 inet manual
 5
 6 # Xen Bridge Interface
 7 auto xenbr0
 8 iface xenbr0 inet static
 9   # bind specified ports to the bridge
10   bridge_ports  eno1
11   # disable Spanning Tree Protocol
12   bridge_stp    off
13   # no delay before a port becomes available
14   bridge_maxwait        0
15   # no forwarding delay
16   bridge_fd     0
17   address       192.168.1.18
18   netmask       255.255.255.0
19   gateway       192.168.1.1
20   dns-nameservers 192.168.1.1 8.8.8.8 8.8.4.4
Reboot; ensure the bridge comes up and ping works.
 1 cdcd@xen01:~$ sudo init 6
 2 Connection to xen01 closed by remote host.
 3 $ ping xen01
 4 PING xen01 (xen01): 56 data bytes
 5 Request timeout for icmp_seq 0
 6 Request timeout for icmp_seq 1
 7 Request timeout for icmp_seq 2
 8 Request timeout for icmp_seq 3
 9 Request timeout for icmp_seq 4
10 Request timeout for icmp_seq 5
11 64 bytes from xen01: icmp_seq=6 ttl=64 time=33.443 ms
12 64 bytes from xen01: icmp_seq=7 ttl=64 time=2.516 ms
13 64 bytes from xen01: icmp_seq=8 ttl=64 time=2.612 ms
14 $ ssh xen01
15 cdcd@xen01:~$ ping www.google.com
16 PING www.google.com (216.58.216.132) 56(84) bytes of data.
17 64 bytes from sea15s01-in-f132.1e100.net (216.58.216.132): icmp_seq=1 ttl=51 time=24.9 ms
18 cdcd@xen01:~$ ifconfig
19 [ snipped lo/loopback ]
20 eno1      Link encap:Ethernet  HWaddr
21           UP BROADCAST RUNNING MULTICAST  MTU:1500  Metric:1
22           RX packets:123 errors:0 dropped:0 overruns:0 frame:0
23           TX packets:76 errors:0 dropped:0 overruns:0 carrier:0
24           collisions:0 txqueuelen:1000
25           RX bytes:15482 (15.4 KB)  TX bytes:10725 (10.7 KB)
26           Interrupt:18 Memory:fbd00000-fbd20000
27
28 xenbr0    Link encap:Ethernet  HWaddr
29           inet addr:192.168.1.18  Bcast:192.168.1.255  Mask:255.255.255.0
30           inet6 addr: fe80::16da:e9ff:fe4f:9aa0/64 Scope:Link
31           UP BROADCAST RUNNING MULTICAST  MTU:1500  Metric:1
32           RX packets:123 errors:0 dropped:0 overruns:0 frame:0
33           TX packets:76 errors:0 dropped:0 overruns:0 carrier:0
34           collisions:0 txqueuelen:0
35           RX bytes:13268 (13.2 KB)  TX bytes:10385 (10.3 KB)
Checkpoint
At this point, the Xen host has:
- a fresh Ubuntu installation
- LVM support
- bridged networking configured and working
Now to install the hypervisor software, boot into the xen kernel, and configure Xen for optimal performance.
Install Xen Software
This section follows the Ubuntu Wiki article for Xen.
Use apt-cache search xen-hypervisor to find the latest version of Xen.
1 cdcd@xen01:~$ apt-cache search xen-hypervisor
2 xen-hypervisor-4.4-amd64 - Transitional package for upgrade
3 xen-hypervisor-4.5-amd64 - Xen Hypervisor on AMD64
Install the package with sudo apt-get -y install xen-hypervisor-<VERSION>-<ARCH>. The output below shows the installation of various Xen packages and grub entries.
 1 cdcd@xen01:~$ sudo apt-get -y install xen-hypervisor-4.5-amd64
 2 Reading package lists... Done
 3 Building dependency tree
 4 Reading state information... Done
 5 The following extra packages will be installed:
 6   acl cpu-checker grub-xen-bin grub-xen-host ipxe-qemu libaio1 libasound2 libasound2-data libasyncns0 libbluetooth3 libboost-system1.58.0 libboost-thread1.58.0 libbrlapi0.6
 7   libcaca0 libfdt1 libflac8 libjpeg-turbo8 libjpeg8 libnspr4 libnss3 libnss3-nssdb libogg0 libopus0 libpixman-1-0 libpulse0 libpython-stdlib librados2 librbd1 libsdl1.2debian
 8   libsndfile1 libspice-server1 libusbredirparser1 libvorbis0a libvorbisenc2 libxen-4.5 libxenstore3.0 libyajl2 msr-tools python python-minimal python2.7 python2.7-minimal
 9   qemu-block-extra qemu-system-common qemu-system-x86 qemu-utils seabios sharutils xen-utils-4.5 xen-utils-common xenstore-utils
10 Suggested packages:
11   libasound2-plugins alsa-utils opus-tools pulseaudio python-doc python-tk python2.7-doc binutils binfmt-support samba vde2 sgabios ovmf debootstrap bsd-mailx mailx
12 Recommended packages:
13   xen-hypervisor-4.5
14 The following NEW packages will be installed:
15   acl cpu-checker grub-xen-bin grub-xen-host ipxe-qemu libaio1 libasound2 libasound2-data libasyncns0 libbluetooth3 libboost-system1.58.0 libboost-thread1.58.0 libbrlapi0.6
16   libcaca0 libfdt1 libflac8 libjpeg-turbo8 libjpeg8 libnspr4 libnss3 libnss3-nssdb libogg0 libopus0 libpixman-1-0 libpulse0 libpython-stdlib librados2 librbd1 libsdl1.2debian
17   libsndfile1 libspice-server1 libusbredirparser1 libvorbis0a libvorbisenc2 libxen-4.5 libxenstore3.0 libyajl2 msr-tools python python-minimal python2.7 python2.7-minimal
18   qemu-block-extra qemu-system-common qemu-system-x86 qemu-utils seabios sharutils xen-hypervisor-4.5-amd64 xen-utils-4.5 xen-utils-common xenstore-utils
19 0 upgraded, 52 newly installed, 0 to remove and 0 not upgraded.
20 Need to get 16.8 MB of archives.
21 After this operation, 63.9 MB of additional disk space will be used.
22 [ snipped ]
23 Setting up xen-hypervisor-4.5-amd64 (4.5.1-0ubuntu1) ...
24 Including Xen overrides from /etc/default/grub.d/xen.cfg
25 WARNING: GRUB_DEFAULT changed to boot into Xen by default!
26          Edit /etc/default/grub.d/xen.cfg to avoid this warning.
27 Generating grub configuration file ...
28 Found linux image: /boot/vmlinuz-4.2.0-16-generic
29 Found initrd image: /boot/initrd.img-4.2.0-16-generic
30 Found linux image: /boot/vmlinuz-4.2.0-16-generic
31 Found initrd image: /boot/initrd.img-4.2.0-16-generic
32 Found linux image: /boot/vmlinuz-4.2.0-16-generic
33 Found initrd image: /boot/initrd.img-4.2.0-16-generic
34 done
35 Setting up xenstore-utils (4.5.1-0ubuntu1) ...
36 Setting up xen-utils-common (4.5.1-0ubuntu1) ...
37
38 Creating config file /etc/default/xen with new version
39 Setting up xen-utils-4.5 (4.5.1-0ubuntu1) ...
40 Setting up grub-xen-bin (2.02~beta2-29) ...
41 Setting up grub-xen-host (2.02~beta2-29) ...
42 Setting up libnss3-nssdb (2:3.19.2-1ubuntu1) ...
43 Setting up libnss3:amd64 (2:3.19.2-1ubuntu1) ...
44 Setting up librados2 (0.94.3-0ubuntu2) ...
45 Setting up librbd1 (0.94.3-0ubuntu2) ...
46 Setting up qemu-block-extra:amd64 (1:2.3+dfsg-5ubuntu9) ...
47 Setting up qemu-system-common (1:2.3+dfsg-5ubuntu9) ...
48 Setting up qemu-system-x86 (1:2.3+dfsg-5ubuntu9) ...
49 Setting up qemu-utils (1:2.3+dfsg-5ubuntu9) ...
50 Processing triggers for libc-bin (2.21-0ubuntu4) ...
51 Processing triggers for ureadahead (0.100.0-19) ...
52 Processing triggers for systemd (225-1ubuntu9) ...
Configuration Changes
Update the Xen grub config to limit the memory dom0 consumes to 512MB. Run update-grub to apply the changes.
 1 cdcd@xen01:~$ sudo vi /etc/default/grub.d/xen.cfg
 2 #
 3 # Uncomment the following variable and set to 0 or 1 to avoid warning.
 4 #
 5 XEN_OVERRIDE_GRUB_DEFAULT=1
 6
 7 # The following two are used to generate arguments for the hypervisor:
 8 #
 9 GRUB_CMDLINE_XEN_DEFAULT="dom0_mem=512M,max:512M"
10 #GRUB_CMDLINE_XEN=""
11
12 [ snipped ]
13
14 cdcd@xen01:~$ sudo update-grub
15 Including Xen overrides from /etc/default/grub.d/xen.cfg
16 Generating grub configuration file ...
17 Found linux image: /boot/vmlinuz-4.2.0-16-generic
18 Found initrd image: /boot/initrd.img-4.2.0-16-generic
19 Found linux image: /boot/vmlinuz-4.2.0-16-generic
20 Found initrd image: /boot/initrd.img-4.2.0-16-generic
21 Found linux image: /boot/vmlinuz-4.2.0-16-generic
22 Found initrd image: /boot/initrd.img-4.2.0-16-generic
23 done
Disable auto-ballooning in xl by modifying /etc/xen/xl.conf.
1 cdcd@xen01:~$ sudo vi /etc/xen/xl.conf
2 autoballoon="off"
3 vif.default.bridge="xenbr0"
Reboot
Reboot the system onto the Xen grub entry.
1 cdcd@xen01:~$ sudo init 6
2 Connection to xen01 closed by remote host.
xl list
Upon restart, list the domains currently running and verify only Domain-0 is up and operating.
1 cdcd@xen01:~$ sudo xl list
2 Name                                        ID   Mem VCPUs	State	Time(s)
3 Domain-0                                     0   511     8     r-----       8.2
dom0 is running (r-----) with 512MB of memory and 8 vCPUs.
Troubleshooting
If xl list did not return successfully then Xen is not correctly installed or running.
One possibility is that the Xen grub entry was not selected upon restart. This will require manual intervention during the server boot-up or modifying the grub config to change the GRUB_DEFAULT entry in /etc/default/grub.
First Guest
According to Xen terminology:
[a guest is] an operating system that can run within the Xen environment
The first guest will be an Ubuntu 15.04 (vivid) installation. The steps below result in a console session to perform a typical Ubuntu installation. This does not use preseeding – that is for another post.
This follows the Xen article on the Ubuntu wiki.
Download Boot Media
A VM needs to load and run something; to perform a new installation that means loading and running the Ubuntu installer. The process below is for the Ubuntu net installer.
There are two steps:
- create a directory to store the images (
/var/lib/xen/images/ubuntu/vivid) - download
vmlinuzandinitrd.gzfrom a mirror
1 cdcd@xen01:~$ sudo mkdir -p /var/lib/xen/images/ubuntu/vivid
2 cdcd@xen01:~$ cd /var/lib/xen/images/ubuntu/vivid
3 cdcd@xen01:~$ sudo wget http://mirror.pnl.gov/ubuntu/dists/vivid/main/installer-amd64/current/images/netboot/xen/initrd.gz
4 cdcd@xen01:~$ sudo wget http://mirror.pnl.gov/ubuntu/dists/vivid/main/installer-amd64/current/images/netboot/xen/vmlinuz
Create Logical Volume for Guest
Create a new Logical Volume (lvcreate) to use for the guest’s disk. The initial Volume Group (VG) should have been created during the installation of the Xen host. The new LV needs a name (-n) and a size (-L).
In the examples below, the resulting VM will be a Mesos Master and the name mmaster0 is used with an installation size of 50G. Your values will differ.
First, find the name of the Volume Group that will hold the new volume using the vgs command. The output below shows a VG named xen01-vg with 2 volumes already created and over 900GB of disk space free.
1 cdcd@xen01:~$ sudo vgs
2 VG       #PV #LV #SN Attr   VSize   VFree
3 xen01-vg   1   2   0 wz--n- 930.77g 907.49g
To create a new volume on the VG from above, use the lvcreate command. The format is lvcreate -L <SIZE> -n <NAME> /dev/<VOLUME GROUP NAME>.
1 cdcd@xen01:~$ sudo lvcreate -L 50G -n mmaster01 /dev/xen01-vg
2 Logical volume "mmaster01" created.
3 cdcd@xen01:~$ sudo lvs
4 LV        VG       Attr       LSize
5 mmaster01 xen01-vg -wi-a----- 50.00g
6 root      xen01-vg -wi-ao----  7.38g
7 swap_1    xen01-vg -wi-ao---- 15.91g
Create Guest Configuration
Copy the provided /etc/xen/xlexample.pvlinux configuration file and tailor it to the values from above. The values that must be changed are: name, kernel, ramdisk, and disk.
The suffix pvlinux refers to paravirtualization, which is more lightweight and efficient than its full virtualization (HVM) counterpart. However, it requires that the guest operating system has proper kernel and driver support (which Ubuntu has). Visit the Xen wiki for more information on guest types.
 1 cdcd@xen01:~$ cd /etc/xen
 2 cdcd@xen01:/etc/xen$ sudo cp xlexample.pvlinux mmaster01.cfg
 3 cdcd@xen01:/etc/xen$ sudo vi mmaster01.cfg
 4 # Guest name
 5 name = "mmaster01"
 6
 7 # Kernel image to boot
 8 kernel = "/var/lib/xen/images/ubuntu/vivid/vmlinuz"
 9
10 # Ramdisk (optional)
11 ramdisk = "/var/lib/xen/images/ubuntu/vivid/initrd.gz"
12
13 # Initial memory allocation (MB)
14 memory = 2048
15
16 # Number of VCPUS
17 vcpus = 2
18
19 # Network devices
20 vif = [ '' ]
21
22 # Disk Devices
23 disk = [ '/dev/xen01-vg/mmaster01,raw,xvda,rw' ]
Run It
Create the new guest with xl create and immediately connect to the console (-c). Perform a standard installation and reboot the instance when instructed.
NOTE: To exit the console, use CTRL+] (^])
1 cdcd@xen01:~$ sudo xl create -c /etc/xen/mmaster01.cfg
2 Parsing config from /etc/xen/mmaster01.cfg
Finalize VM Config
The configuration from the step before points to the installation media, which is great for installing a new system. However, to actually run the installed system the boot manager on the guest’s disk needs to be executed.
Xen provides PyGrub – a grub-like bootloader written in Python – for this purpose (running a guest’s boot manager). To use pygrub, the guest’s configuration needs to updated to use a bootloader and to no longer use kernel and ramdisk. Let’s do that now.
First, shut down the guest if it is still running:
1 cdcd@xen01:~$ sudo xl shutdown mmaster01Next, locate the pygrub application:
1 cdcd@xen01:~$ find / -name 'pygrub' 2>/dev/null
2 /usr/lib/xen-4.5/bin/pygrub
Finally, update the guest configuration:
- comment out (
#) or removekernelandramdisk - add
bootloader - leave the rest as-is
 1 cdcd@xen01:~$ sudo vi /etc/xen/mmaster01.cfg
 2 # Guest name
 3 name = "mmaster01"
 4
 5 # Kernel image to boot
 6 #kernel = "/var/lib/xen/images/ubuntu/vivid/vmlinuz"
 7
 8 # Ramdisk (optional)
 9 #ramdisk = "/var/lib/xen/images/ubuntu/vivid/initrd.gz"
10
11 # bootloader
12 bootloader = "/usr/lib/xen-4.5/bin/pygrub"
13
14 # Initial memory allocation (MB)
15 memory = 2048
16
17 # Number of VCPUS
18 vcpus = 2
19
20 # Network devices
21 vif = [ '' ]
22
23 # Disk Devices
24 disk = [ '/dev/xen01-vg/mmaster01,raw,xvda,rw' ]
Final Run
And now re-run xl create.
 1 cdcd@xen01:~$ sudo xl create -c /etc/xen/mmaster01.cfg
 2 Parsing config from /etc/xen/mmaster01.cfg
 3
 4 pyGRUB  version 0.6
 5 ┌────────────────────────────────────────────────────────────────────────┐
 6 │ Ubuntu                                                                 │
 7 │ Ubuntu, with Linux 3.19.0-31-generic                                   │
 8 │ Ubuntu, with Linux 3.19.0-31-generic (recovery mode)                   │
 9 │                                                                        │
10 │                                                                        │
11 │                                                                        │
12 │                                                                        │
13 │                                                                        │
14 └────────────────────────────────────────────────────────────────────────┘
15  Use the ^ and ┴ keys to select which entry is highlighted.
16  Press enter to boot the selected OS, 'e' to edit the
17  commands before booting, 'a' to modify the kernel arguments
18  before booting, or 'c' for a command line.
19
20 [ snipped boot-up log ]
21
22 Ubuntu 15.04 mmaster01 hvc0
23
24 mmaster01 login: